In this post, I’ll cover a crucial topic — your DAW’s basic settings. These settings determine whether your work on arrangement, mixing, and mastering will sound at a professional studio level. Even if all other stages are executed perfectly, incorrect project parameters can become the “bottleneck” that degrades the quality of your audio material. Many beatmakers (especially in the FL Studio community) advise always using a 48 kHz sample rate. But is this choice universal? Let’s figure it out.
Digital audio is a stream of data obtained by measuring signal amplitude at equal intervals (sampling). However, when generating sound inside synthesizers (especially those with sharp waveforms like sawtooth or square), as well as during intensive processing, ultra-high harmonics are produced.
This effect is particularly noticeable in plugins that alter the waveform: distortions, saturators, and aggressive compressors. If the frequency of the new harmonics generated by these effects exceeds half the project’s sample rate (the so-called Nyquist limit), they cannot be accurately represented and are “reflected” back into the audible spectrum. This creates non-harmonic distortions and digital artifacts—aliasing.
To combat this effect, developers use oversampling technology. Its essence is simple: inside the plugin, the sample rate is temporarily increased several times (for example, from 48 kHz to 96 kHz with 2x oversampling). This provides the necessary frequency “headroom,” allowing the algorithms to process sound generation or effects without creating unwanted reflections. After the calculations are complete, the signal is returned to the project’s original sample rate, but without the extra digital artifacts. However, it wasn’t always this way.
Let’s look at how this is implemented in the legendary Reason 13. The Swedish developers at Propellerhead (now Reason Studios) are true veterans of the industry. Their classic synthesizers—Subtractor, Malström, and Thor—which appeared in the early versions of the program, remain the backbone of this DAW’s “signature sound.”
Reason: Malström
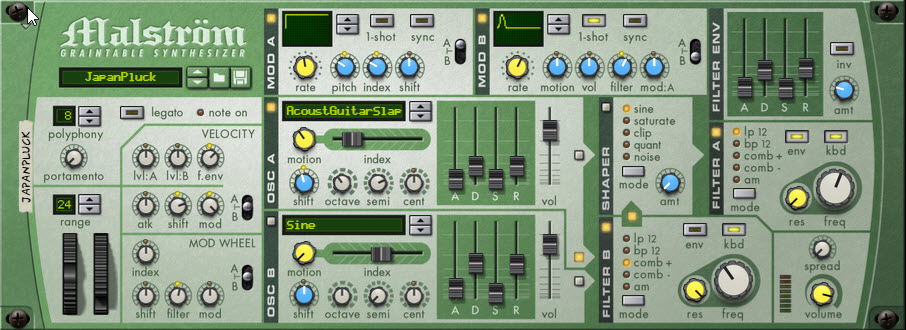
However, there’s a technical nuance here. Oversampling requires massive CPU resources, which were in short supply when these instruments were first released. To allow users to create multi-layered arrangements even on weak PCs, the developers didn’t hardcode oversampling into these synths. As a result, when working at standard 44.1 or 48 kHz, aliasing can occur on high notes—barely audible metallic artifacts or extra “grit” that robs the sound of its crystal clarity.
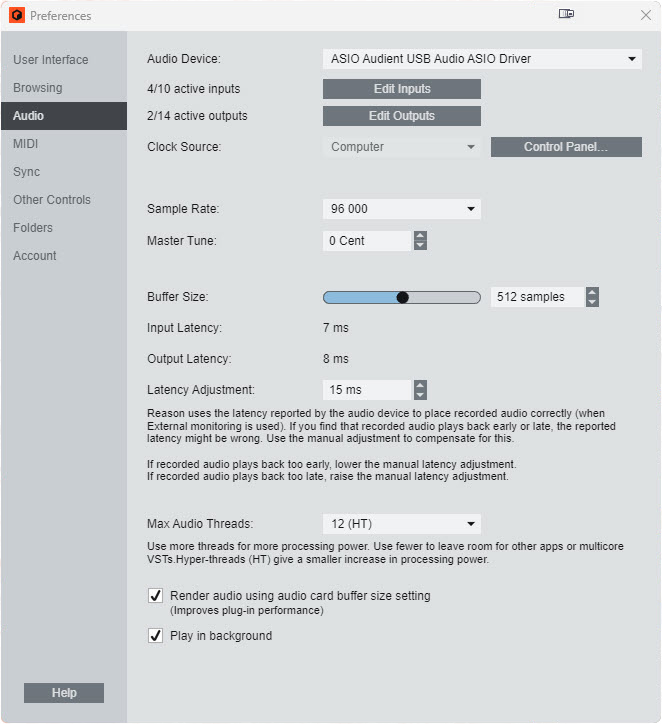
This characteristic persists in Reason 13, as rewriting the code of these legacy engines without altering their unique character is nearly impossible. The solution is simple and effective: set the project’s system sample rate to 96 kHz. In this case, the Nyquist limit is pushed far beyond the audible range, and aliasing disappears, allowing the oscillators to sound clean and open.
Credit must be given to their optimization: Reason’s ecosystem is so resource-efficient that even at 96 kHz, a modern laptop can handle dozens of instances of Thor or Malström without freezes or CPU overload. This allows you to enjoy the classic sound of these synthesizers without compromising on quality. After all, Thor, Malström, and Subtractor are like old, reliable friends you occasionally want to return to for inspiration or a touch of nostalgia.
Note
Speaking of Reason, it’s worth mentioning another important detail. If you’re working on a project with a 96 kHz sample rate, you should also perform the final export (rendering) at this same value.
The thing is, if your project is running at 96 kHz but you set the export settings to 48 kHz, Reason will recalculate the synth engines for the lower audio resolution. As a result, all that clean sound you heard while working will “collapse,” and aliasing will creep back into the rendered file. It’s a frustrating situation: everything sounds perfect in the DAW, but the finished file sounds worse.
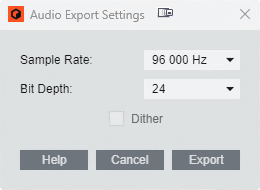
Therefore, to ensure your music retains all its detail, set the export to the same 96 kHz and the Bit Depth to 24-bit. This will preserve the result of your work without unnecessary losses or artifacts, capturing exactly the sound you created in your project.
Reason: Project Sample Rate
Reason: Export Settings
The creators of Reaper follow a completely different philosophy. While Reason is a self-contained and powerful arsenal of instruments and effects, Reaper is a highly flexible and lightweight “shell” that can be customized for any task. Its motto is: “Bring the third-party instruments and effects you love, and I’ll handle the stability and workflow.”
Thanks to phenomenal optimization, the developers implemented a global oversampling feature (starting from version 6.53). It’s not active by default, but it can be enabled specifically for certain plugins or entire chains. This literally breathes new life into classic instruments like Sylenth1 or those very same legendary synthesizers inside the Reason Rack Plugin.
Reaper: Global Oversampling
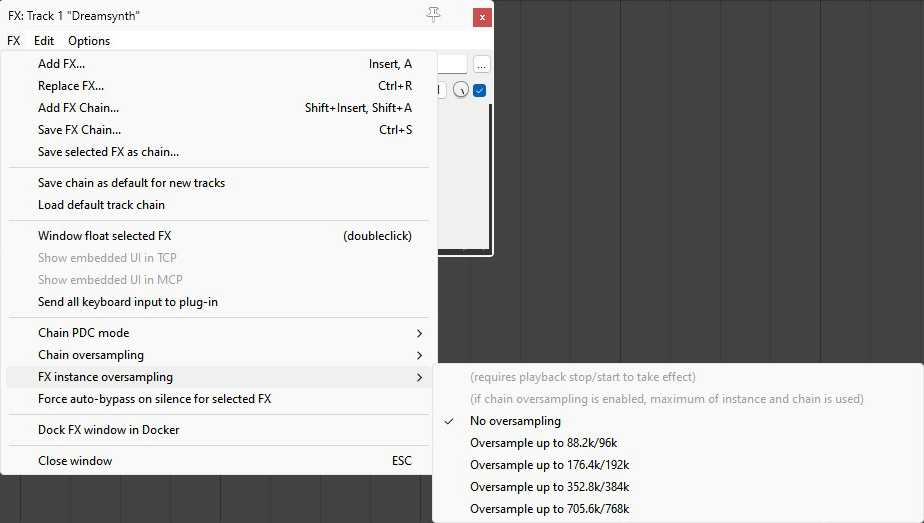
It’s important to understand: not every instrument in the “Rack” needs oversampling. Modern additions like Algoritm sound crystal clear without it, thanks to optimized code. But for those devices where aliasing still occurs, Reaper allows you to “boost” their internal resolution without forcing you to switch the entire project to 96 kHz.
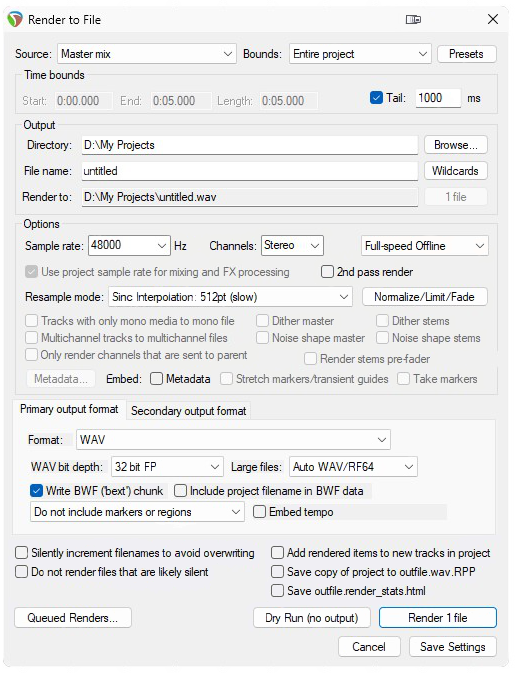
To summarize for Reaper users: work at a comfortable 48 kHz, and enable internal oversampling for quality-dependent plugins. When exporting, stick to 48 kHz as well, selecting a high-quality resampling algorithm (Sinc Interpolation 512pt). A final master file in WAV 32-bit float will provide a massive dynamic range and protect your sound from degradation during accidental peaks. This is the technical gold standard that guarantees the impeccable quality of your mix.
Reaper: Export Settings
Note
Incidentally, many modern virtual synthesizers and effects already have built-in oversampling that works transparently to the user and isn’t always displayed in the interface. Therefore, the most important advice is: learn to trust your ears!
If an instrument sounds clean and correct at the standard 48 kHz sample rate, then no additional settings are needed. If you sense an unpleasant metallic overtone or digital “grit” (aliasing) appearing at high notes, try enabling oversampling within the plugin itself (if available) or increase the project’s working sample rate. Do you hear a difference? Does the sound become more open and natural? Congratulations—you’ve just successfully applied theory to practice and conquered the aliasing problem! Now nothing stands in the way of your creativity sounding truly professional.
And finally, the last on our list, but certainly not least—FL Studio! Thanks to its incredibly fast pattern creation and editing process, the best-in-class Piano Roll, and lifetime free updates, it has long earned the status of the “People’s DAW.”
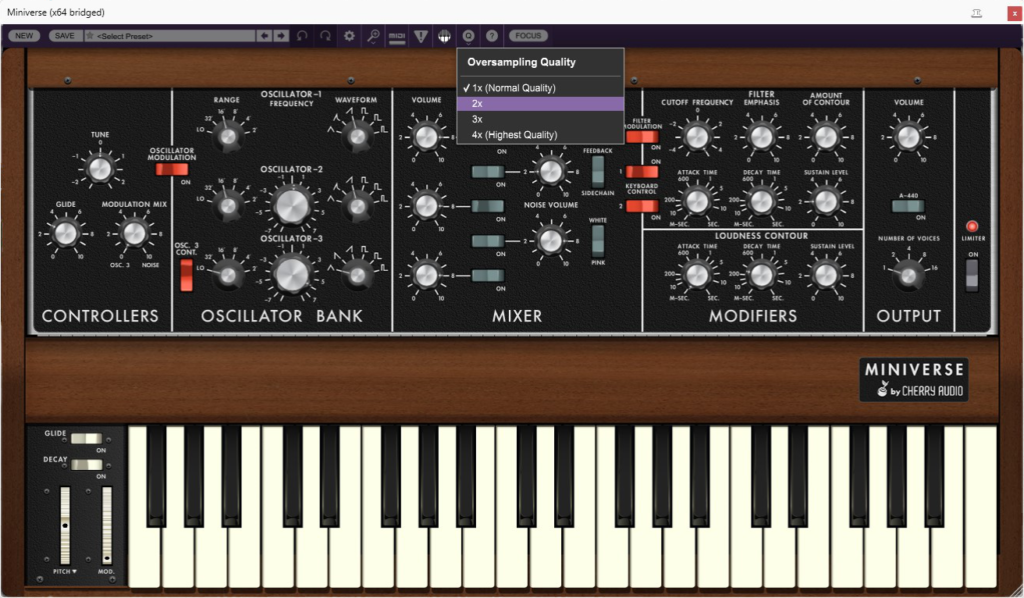
How do things stand with sample rate here? FL’s philosophy can be summed up with the phrase: “each plugin for itself.” Unlike Reaper, FL Studio cannot forcibly impose global oversampling on third-party plugins if it’s not provided for by their developers. But if an instrument supports this function—the “Fruity” one handles it excellently! Many third-party manufacturers, like Cherry Audio, allow you to adjust the oversampling degree directly within the plugin’s internal settings.
Cherry Audio Miniverse: Oversampling Quality Settings
Important
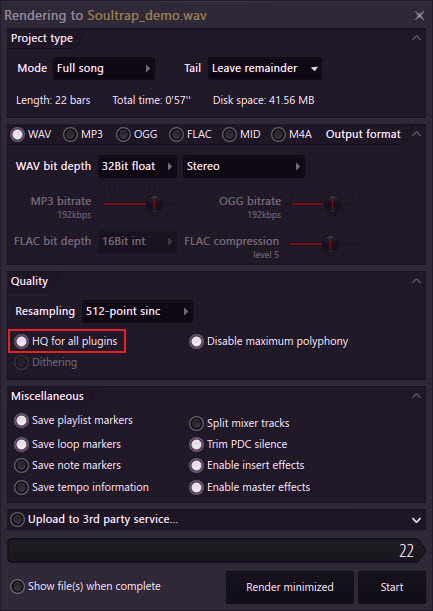
Important nuance: to ensure the high-quality settings of stock plugins actually take effect during export, be sure to select “HQ for all plugins” in the project rendering menu.
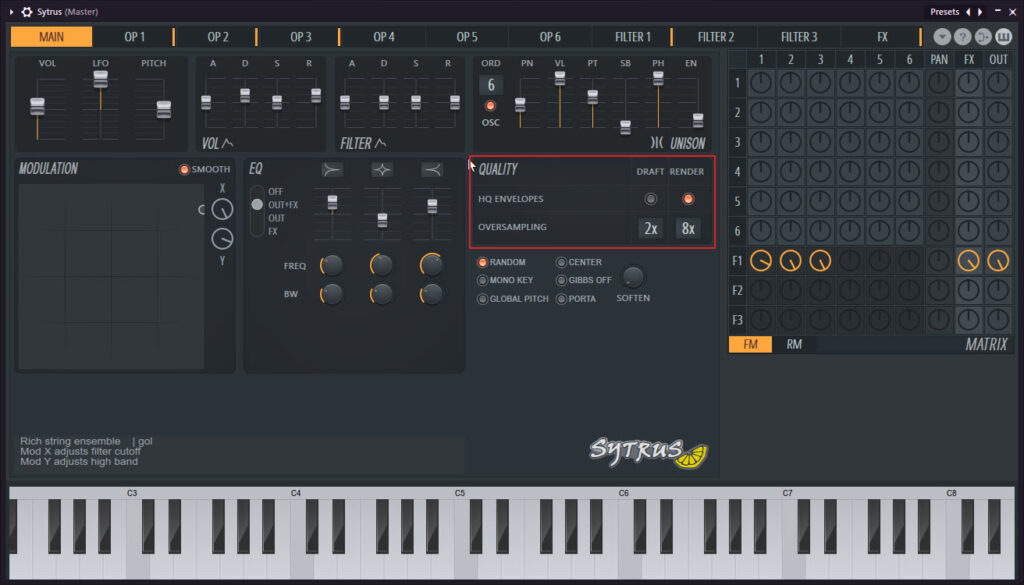
Without this checkbox, FL Studio will ignore your efforts. It’s important to remember: in many FL plugins, this button activates oversampling only at the moment of rendering to conserve CPU resources during work. So, if you still catch aliasing by ear, look into the specific instrument’s settings—often you can manually set Draft mode for work and Ultra mode for final rendering.
Cytrus: Realtime Play and Render Settings
Ultimately, my recipe for FL Studio is simple: work at a comfortable 48 kHz, trust your ears, and if you encounter a “finicky” plugin in your project without internal oversampling settings, simply increase the entire project’s working sample rate to 96 kHz. For final export, the settings are standard: WAV format, 32-bit float bit depth, and a 512-point sinc resampling algorithm. This ensures the listener receives exactly the sound you worked so meticulously to create.
FL Studio: Export Settings
A special mention goes to those who compose orchestral music for film and television. Unlike modern electronic music with its dense, compressed sound, orchestral soundtracks inhabit a world of vast dynamic range. Here, some instruments may barely whisper, while others can deafen with the power of a full brass section. Realism and subtle articulation are more important here than loudness. If we look at the process technically: the higher the sample rate, the more accurately the sound decays (reverb tails) and transients (attacks) of live instruments are rendered. This is why orchestral composers often raise the bar to 96 kHz, and sometimes to 192 kHz. This helps preserve the naturalness of the space and the “air,” without which an orchestra loses its magic. In fact, this niche has so much unique specificity that it deserves a detailed discussion of its own in the future.
Spitfire Audio: Abbey Road Two Strings Library

Within the scope of this topic, I could analyze the settings of other popular DAWs, but for now, I’ll limit myself to these three. I have experience working with Cubase and Bitwig (I actively used them via a Splice subscription at one point), but I don’t currently have up-to-date full licenses for detailed testing.
As for Ableton Live—you might object: “But Ableton is no less popular than FL Studio, why isn’t it covered here?” I agree. However, the market is already saturated with courses on Ableton, and in this article, I wanted to focus on tools I am personally confident in and whose nuances I have studied through practice. After all, the most important thing is not the program’s name, but how cleanly and honestly your music sounds at the output.
Each DAW has its own philosophy, which shapes your workflow. My task is to provide you with the necessary technical foundation without making it tedious and to teach you to understand your DAW. If you add consistent practice to this, many creative decisions will start to come to you intuitively.
If you want to not just know the theory but also apply it in practice under my guidance, I invite you to our closed community. This space is created specifically for those who are passionate about learning to write music professionally and are ready to practice seriously, mastering the techniques of arrangement, mixing, and mastering hands-on.
I strive to create an active community, energized to write great music. Every month, I give custom homework assignments with hints on how to complete them. My students can communicate and consult with each other during the process, sharing experiences. At the end of each month, I hold a closed stream where I analyze the completed assignments in detail, highlighting strengths and suggesting what and how can be improved.
Want to turn theory into skills? I’m waiting for you in our community!